Room Acoustics Study


0 comments

Final moments

These are the final moments of our studies at the energy lab. Throughout these last few months, we have been able to work with different types of equipment, exploring many unique fields of science and technology.

Since I haven't been updating my weblog in the last few weeks, I am going to offer an extensive collection of pictures of what we have been involved with recently.

The following pictures offer a small insight on the work we have been doing in the last months.

Leap Motion sensor

The leap motion controller uses two IR sensors to track the motion of both the hands of the user. We used this device to control apps and devices such as Safari, Google Earth, various Leap games and different music programs. The leap controller is a phenomenal demonstration of how humans can build seamless physical interfaces to control and create in the digital world.

Room Acoustics Project

This project involves the study of the quality of room acoustics in different buildings of our school. With a dedicated program (Fuzz Measure), a omnidirectional microphone and a pair of speakers, I recorded the decay time of a loud sine wave sound and analyzed its frequency response. In a future entry, I will post a pdf describing the nature of the project.

Intro to electrical engineering

During the rainy days of late april, we explored the domain of electrical engineering and digital signal processing. Dr Bill introduced us to three different types of oscilloscopes: Analog (on the right) , LED (in the middle) and digital (analog discovery kit on the left). The Analog discovery kit was also able to synthesize different waveforms in addition to its integrated digital oscilloscope.

Apple and MacWorld.

On thursday afternoon, Bill and I had the pleasure to present at the Rapid Fire session at MacWorld. I showcased my EEG to MIDI project, describing the methods, the gear and the purpose of my research. Rapid Fire consists of different presentations that are rigorously exposed under 5 minutes. This year, a big LED screen was installed at the back of the speakers, displaying the 5 minute countdown. Once the time limit is elapsed, the speaker is forced to stop his presentation. At this year's session, speakers from all over the country shared advice, information and knowledge about many different topics, ranging from mobile productivity to humor and technology. During my brief presentation, I displayed from my computer the software that I used to generate waveforms with EEG technology.
The Talk was a great success, with a large number of people in the audience spectating the show. I had the opportunity to meet a professor from Berklee University who was working on similar projects in the field of music production and technology, and who turned out to come from the same place where I was born, in Italy. The atmosphere at MacWorld was magical and inspiring; the vastness of the expos and the large number of people coming in and out of Moscone north was overwhelming. This great opportunity for sharing knowledge, passion and formidable idea created a tangible feeling of excitement in all of us, Hpa students.
Friday was perhaps the day to look forward to the most on our calendar. After an early wake and a quick breafast, we drove to the Apple campus in the nearby city of Cupertino. This time, we found ourselves in front of the famous Infinite Loop 1 building, an elegant glass structure that hosts the executive headquarters of the company. The neat design and layout of the campus clearly depicted the philosophy of Apple products, a functional, pristine looking place where brilliants minds meet everyday. We had the pleasure to present our projects to a small audience of software engineers, educational representatives and organizers in a fantastic conference facility. At the end of the round of presentations, we had the opportunity to shop at the company store, where we bought exclusive merchandise (yay!!!).
On saturday, we rounded up our MacWorld experience with our Future Tech presentation. Bo, Hannah, Kenji, Leila, Erina and I presented our Energy Lab projects in a 20 minute per project format, showcasing media, hardware and software used in our projects. Fortunately, Hannah used the projector to display to the audience the hundreds of photo depicting us working on our projects. I was the last person to present, therefore concluding the conference. After a quick, engaging speech, I decided to show to the audience a video of a live demonstration of my project. The feedback of the public was fantastic; a final, loud round of applause concluded our session, therefore our MacWorld expedition. We did it. We went to Mel's and celebrated the end of our journey with a dozen of milkshakes.
This second yearly journey to MacWorld, for me, was an ulterior opportunity to learn, grow and become inspired by bright ideas. Even more then last year, the excitement of visiting these influential events has been fervent and never ending.


0 comments

Arduino Synthesizer

At the end of this incredible period of experimentation, discovery and learning with the Arduino board, I have finally achieved to create a system capable of producing sounds: The Arduino Synthesizer!

This project takes advantage of the Analog In and the Digital out of the Arduino to produce a simple sawtooth wave combined with a pulse wave. The code also features pitch modulation and a low pass filter that includes a resonance parameter.

The sound of the arduino is unpredictable and warm, which is typical of any analog sound generator. The system uses five 10k Ω resistors in series to modulate 5 different parameters:

- Oscillator Pitch
- Filter Cutoff
- Filter Resonance
- Oscillator 1 volume
- Oscillator 2 volume

The code came from tinkerit, http://code.google.com/p/tinkerit/

While playing around with the synthesizer, I used the virtual oscilloscope from electroacoustic toolbox to analyze and observe the waveform coming out of the Arduino synthesizer.
The system looked something something like this:


0 comments

LED Arduino

Today I connected a RGB lgiht bulb to a simple arduino based electronic circuit, I ran 3 x 560 Ω resistors to run the signal of the different basic colors. The combination of the 3 basic colors (Red, Green and Blue) created specific colors (magenta, yellow and cyan).


0 comments

Piezo with the Arduino

Today, I have experimented music with the Arduino. Following an ardx tutorial, I assembled a circuit connected to a piezo element, a device that can reproduce physical sounds. The element can produce very basic tones. I used the code provided by the tutorial, and I made the Arduino sing "twinkly twinkly little star".


0 comments

New ARDX kits

And its time for another christmas in the office. Today we receive the ARDX kits, an all-in one package that allows you to create basic circuits and systems with the Arduino. A booklet with easy to follow tutorials is included in the kit, as well as an arduino uno and a servo. The kit is well packaged, and its hosted in a plastic box with well designed fonts.


0 comments

Sound with sensors

For the next few weeks, I will be trying to construct a synthesizer with the Arduino board. Today, I spent the period finding and organizing the components needed. The board is going to use two light dependent resistors and a piezo to modulate parameters of an FM (Frequency modulation) sound synthesis engine.


These are the parts I have found do far, I still need a couple resistors, a piezo and an audio socket.


The tutorial for making the project can be found at http://sensorium.github.io/Mozzi/learn/introductory-tutorial/

0 comments

Blog Impressions

I took a look at Cannon's weblog, especially his day 6 tutorial:
http://physics.hpa.edu/users/cgreco/weblog/c94df/Day_6_Raspberry_Pi.html

I have enjoyed reading Cannon's tutorial on how to create a raspberry pi web server; the layout of the explanations are intuitive and easy to follow. The availability of links for downloading the necessary software is key to this kind of tutorial, and Cannon has posted them clearly and neatly.


I am happy that he posted screenshots, which are definitely useful for both first timers and experts.

I will be very sad to abandon my arduino boards, but the raspberry pi looks like an interesting field to approach. From the weblogs of the team, I have understood that the raspberry pi is a more puristic approach to the subject of computer science. It's a board that can run independently entire operating systems as well as hosting different computing languages.

0 comments

Piloting the drone

Today we took some time off our Arduino studies and decided to pilot the phantom drone. With the GoPro hero 3 camera we recorded short videos of 10 minutes. We got some amazing footage, the camera depicted the greens very well and had a fantastic definition. The zen muse kept the camera straight and sturdy despite my "Nicky Lauda" piloting technique.


0 comments

Servo, controlled

Today we connected a servo to the board. We could control its movement with a potentiometer, which was connected to the board as well.


0 comments

LCD display

Without any electrical engineering background, my colleague Bo Bleckel and I attempted to connect a liquid crystal display to the arduino. However, we couldn't find a way of connecting the variable resistor to the system.

We even attempted to connect the arduino board to an M-Audio active speaker (should have used a passive one), again, without success. hannah, meanwhile, is having a lot of fun with her experiments, using example sheets. Down here is an example of the experiment she did with 8 blinking lights.

Eventually, we had the crazy idea of connecting a servo to the board. We followed the tutorial at http://arduino.cc/en/uploads/Tutorial/sweep and it worked! The servo was moving.

This is the schematic


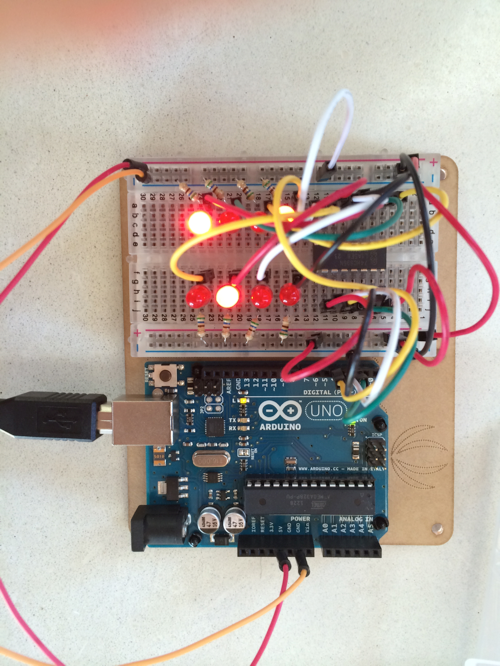
Here's the video of our system:
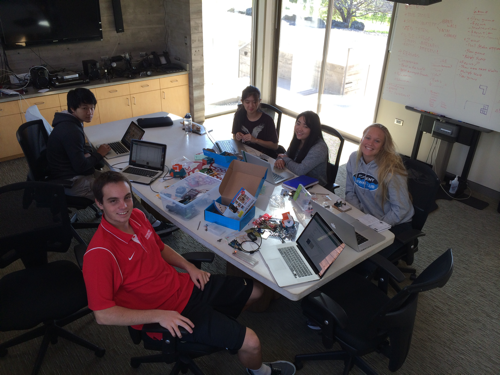

After the initial fails, our hearts were filled with this achievement. We will keep trying these entertaining experiments and get more familiar with circuits. More soon!

0 comments

Arduino Team

Buongiorno!

Today, we formed the Arduino team. A new group of young and passionate talents that will work with the Arduino boards.
- Our Team -

Today we have unpacked the first boards (yeah! it felt like Christmas!) and tried to upload our first codes, while trying to get familiar with the Arduino Software. The software is a simple GUI with a basic commanding language layout that is meant to be used to write codes for electronic controls and impulses.

- The GUI -

While I had some problems with my command port, Bo used a couple of electrical wire and a resistor to light up a beam that would go on and off. Hannah also assembled and uploaded the code for keeping a green light on.
- Bo's setup and his magic light -


- My setup -


We have achieved our first results and we are eager to learn more. Our team is excited to work with this open source device that can offer so many possibilities. More updates soon, stay tuned!

0 comments

Treasure Hunt #2

Today we had other tasks for our treasure hunt.

Link rate test

Html test


0 comments

Treasure Hunt

Task 1


SSID name is "go away"
We accessed the wi-fi access point and used the ipv4 address 192.168.1.21 (eventually we stole this address from a dude 20 miles away)
We went on the address 192.168.1.20 and changed the network name to "ITALYYYY"
Task 3
I accessed Bo's computer and typed "history", with showed us all the commands that Bo gave to terminal (he already accomplished task 3)


we logged in hero brine and did our job, see pictures


0 comments

Intro to Advanced Computer Tech

Welcome to the Advanced Computer Tech course, here's a sum up of the topics you will come across


The fundamentals
-Terminal commands
-Binary
-TCP/IP

Computer language
html/Pico/CSS

HTML

Pico

http://physics.hpa.edu/users/stinson_kenji/weblog/16941/Notes.html


Advanced Commands

SSH/Traceroute

http://physics.hpa.edu/users/chen_ivan/weblog/93f01/Command_Reference.html

IP Net Monitor

http://physics.hpa.edu/users/balbo_luigi/weblog/37953/Computer_programming_notes_119.html

OSAScript

http://physics.hpa.edu/users/bleckel_bo/weblog/91c4b/12213.html


Using a remote computer

Directory Navigation

http://physics.hpa.edu/users/balbo_luigi/weblog/9de95/Computer_programming_notes_123.html


Wired and Wireless

CAT 5 - Patch cords

http://physics.hpa.edu/users/balbo_luigi/weblog/b4b03/Computer_programming_notes_213.html

Bullet and various antennas

http://physics.hpa.edu/users/balbo_luigi/weblog/002f3/Computer_programming_notes_220.html

Hunting the antenna

http://physics.hpa.edu/users/arakawa_kazu/weblog/f4ae5/UBNT_Scan_Results.html

Energy Systems - Sensor Hunt

http://physics.hpa.edu/users/stinson_kenji/weblog/8a9d9/Energy_Lab_Sensors_.html


During this course, it's absolutely advisable to take advantage of the unique benefits of using the weblog, as it's a limitless source of knowledge and bonus grades, with a constant and efficent use of this tool, you will find yourself on the top of the game , enjoy this incredible course and entertain yourself shutting down the computers of your friends.


0 comments

Computer programming notes 2/20

Today, we did connectivity experiments with the "bullet" ethernet to antenna cable converter and some antennas of various shapes.

From the computer, we linked a ethernet cable to another one with a power box that would work as POE (power of ethernet), to give energy to the signal.
Then, the other end of the cable was connected to the "Bullet" ethernet to antenna converter (shown below)
After that, we connected the "bullet" to different types of antennas, we tried different shapes and tested how many hotspots
they could reach:
1) Dish Antenna: generally, the antenna with more range than others, it captures the signal like a concave mirror, making these signals bounce directly to the "focus" of the antenna.

2) Panel Antenna: Another type of antenna with a great range, with this antenna we were able to catch signals from the Mount Mauna Kea, distant several hundreds of miles from our labs.

3) Omni Antenna: A more conventional type of antenna with a inferior range, but with a 360° angle of signal reception, me and my science seminar buddy Erina tried to use this, but with little success.

4) Directional Antenna: Another conventional antenna with medium range, this type of antenna receives signals only on a straight line, its shape reminds of the typical blaster turrets used by the Empire in Star Wars, unfortunately we didn't have the pleasure of trying yet.

0 comments

Computer programming notes 2/8

More commands, concepts and terminology.

commands:
chmod.....changing reading reading and writing authorizations
< img src= imagename.gif.....searching for an image in the folder you're located
[in finder] cmd+shift+g.....go to...

concepts & terminology:
Q.O.S.....Quality Of Service
Duplex internet.....receiving and sending data at the same time [ethernet]
Half-duplex internet.....only sending or only receiving data in a certain moment [wi-fi]
STP.....shielded twisted pair
UTP.... un-shielded twisted pair

0 comments

Computer programming notes 2/13

In class, we learnt how to create a ethernet cable, from cutting the wires to aligning them in the correct order.

We used a cat5 cable and a rj45, during class we learnt that a ethernet cable is faster than wi-fi because it has a duplex internet connection, meaning that it can send and receive data at the same time.

We tested our cables by connecting two computers with them.

(chords 7 & 8 are inverted)

0 comments

Computer programming notes 1/23

In this lesson we practiced navigating on another computer's system folders.


We logged in on a remote computer using nslookup for the address 10.14.1.2 and we logged in as the user "herobrine", then we started navigating in its system folder.

Starting from the position /Users/herobrine , we started moving upwards to find a hidden file in the applications using the commands cd .. , ls , pwd .

Once we found the "minecraft" folder in the applications folder, we opened a .txt file with the command less findme.txt (find me is the name of the file)


0 comments

Computer programming notes 1/22

In this lesson we learnt about osacript commands and navigation in the system's files via terminal.


osascript commands:
we (students) used these commands against each other, by remotely loggin in computers.
ssh [username]@[IP adress]...remote login.
sudo osascript -e say " " using " "...activates the speech function of the computer, making the computer say a custom made phrase.
sudo Killall "application name"... shuts down immediately an application running.


navigation commands:

cd .. go up of a folder in the system navigation.

ls shows all the folders that are located in your position.

pwd shows the folder where you are located in the navigation.

cd foldername moves immediately to the selected folder


0 comments